
1/72 |
Avia S.199 Mezek The First Fighter Squadron 1948 |

|
|
1/72 |
Avia S.199 Mezek The First Fighter Squadron 1948 |
|
Click on thumbnails below to open full-size image in a new browser window
 |
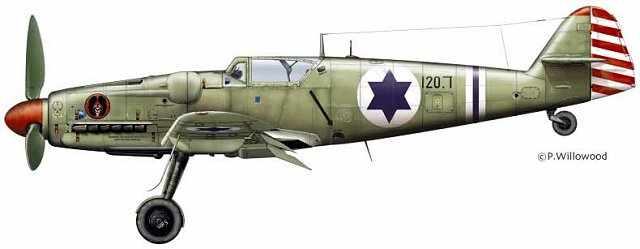
Bought at a very high price
from the Czech government, 24 of these temperamental license built aircraft
(essentially an Me109G-14 with a Junkers
Jumo 211 fitted in place
of the normal Daimler Benz engine) formed the back bone of the Israeli Air Force
at the beginning of the War of Independence. Because of the S.199's bad handling
(the aircraft tended to ground loop due to the large amount of torque developed
by the large paddle blades and the narrow track of the landing gear), this type
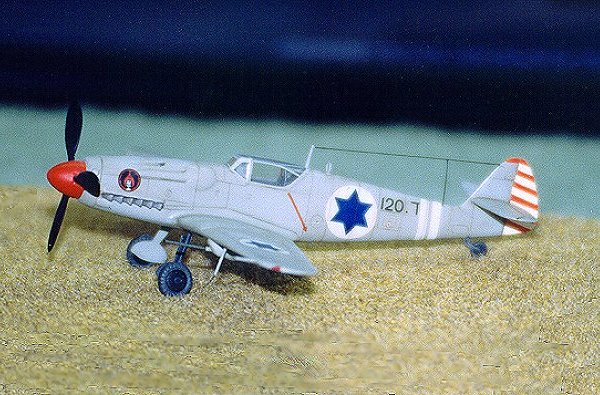
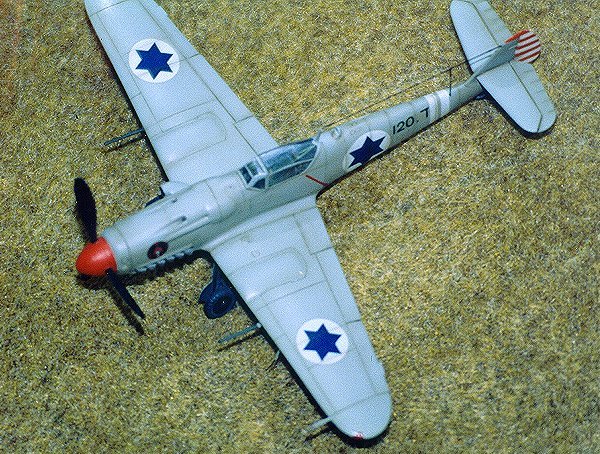
only lasted one year in IDF/AF service. This model is based on a
conversion of the 1/72nd Hasegawa Messerschmitt Bf109G-14 'Gustav 14' (kit
AP18). It represents an Avia S.199 of 101 Squadron, Israeli Air Force/Defence
Force flown by Ezer Weizman in the War of Independence in 1948. As a first step,
the nose of the Hasegawa Bf.109 was sawn off on a line from the rear of the
exhaust stack aperture to the rear of the gun trough, and the nose of the KP
Avia S-199 grafted on. This was then rescribed to match the rest of the model.
There was some filing and sanding required mating the nose to the rest of the
fuselage. The large under nose air intake from the Bf.109 was removed and
replaced with the smaller exhaust of the KP Avia. The air intake provided for
the left side of the nose (part numbers A14 and A15) was added to the right side
of the nose, on top of a piece of 5 thou card to represent the mounting plate. The cockpit interior (parts
C3 and C4) was discarded and replaced with a True Details resin set designed for
the Hasegawa Bf.109, along with the kit stick. For all intents and purposes, the
Bf.109 and S.199 cockpits were the same. The over wing bulges were carefully
removed from the KP kit, and then glued and faired onto the upper surface of the
Hasegawa wing. The only other parts used from the KP kit were the propeller
spinner and paddle blades. The gear legs were replaced with AV Resins' white
metal Avia gear legs and brake lines added from copper wire. The main gear wells
were painted RLM02 as per kit instructions, while the inside of the doors and
legs was painted RLM66. The centre line drop tank
provided in the Hasegawa kit (parts A4, B12 and B13) was not used. Part C12, the
spine antenna, was added (greyed
out on parts call out as "not used"), as were the under wing gondolas
for the cannon (parts A10 through A14). The kit canopy was replaced with a
Falcon/Squadron 'Erla Haube' vac form canopy. The loop antenna on the spine was
replaced with a piece of flattened and looped copper wire, and the radio wires
added from stretched sprue. Wing tip nav. lights were cut out, and each was
replaced with clear toothbrush handle which had been carved and sanded to shape,
with a hole drilled in each to represent the bulb. The cockpit was painted
Gunze Sangyo H339 - a close approximation to RLM 66, and after the seat, stick
and instrument panel had been painted, etched seatbelts were painted and added.
The cockpit was washed in thinned raw umber oil paint, and when dry dry-brushed
with pale grey. The rudder was masked and painted white, and then
the red stripes masked and painted to give the familiar 101 Squadron
candy-stripes. At the
same time, the spinner was painted red. The outside of the aircraft
was painted a faded mix of RLM 68 using the mix recommended on the Ventura
decal sheet (3:1 Humbrol 64 to Humbrol 90). Despite all the conjecture on the
actual
colours, until someone
produces irrefutable proof of the correct
colours, I'm happy with
this
colour mix. The Ventura
decals were applied, though they had very thick carrier film and didn't react
very well to the MicroSet/Sol system. It should be pointed out that there is
some conjecture as to whether the centre of the fuselage roundel on D.120 should
be blue, or the fuselage colour. I opted for the blue Star of David provided on the Ventura
sheet. When painting was finished,
the aircraft was given a wash of thinned Raw Umber oil paint, dry brushed, and
then weathered, before sealing with a coat of Humbrol Dullcote matt varnish.
This was a nice easy conversion to do (don't forget to swap sides for the nose
air intake) and produces a nice model of an aircraft which is not faithfully
represented in 1/72. |
 |